Monday, September 26, 2011

According to the Menu?

A La Carte is a French term which means – “From the Menu”. Technically the expression refers to particular restaurant menus that have several items that can be purchased separately.

So, the next time you visit your favorite place for lunch and you decide to order according to “your taste”, rather than what is already paired for you, (make sure they allow it)don’t automatically assume that you are being difficult or picky. You are simply recognizing that you have certain uniqueness when it comes to choosing food.

If you are the type of person who enjoys putting different types of food together to make your favorite meal, post your creations to this site so we can all see what food parings you are most affectionate of.

Here is a clever blend of items I have compiled that resemble a bistro style lunch menu (my favorite)!


My A La Carte Menu
Crab Cake
Mixed greens, fines herbs, George Paul vinaigrette,
classic sauce – beurre blanc

Garden Vegetable Pasta
Capelli d’ angelo, asparagus, haricot verts, shitake mushroom,
preserved lemon, grape tomatoes, light lemon cream sauce

Baked Cod alla Puttanesca
Roasted new potatoes, sautéed summer squash,
putanesca sauce

Seared Atlantic Salmon
Minnesota wild rice blend, grilled asparagus, béarnaise sauce

Reuben Sandwich
Grilled marble rye, thin cut corned beef, Russian dressing,
sauerkraut, Swiss cheese, French fries

Grilled Turkey Sandwich
Ciabatta roll, gruyere, guacamole, bacon,
roma tomato, French fries

Tuesday, September 20, 2011

The Diet of the Ancient Egyptians

by Sarah Phillips


Doubtless, ancient Egypt's probably eat better than many others in the ancient world. After all, KMT, a name for ancient Egypt refers to its rich, dark, fertile soil and we have no doubt that since the invention of agriculture, Egyptians, with the Nile Valley and Delta, had a distinct advantage over many others when it came to food. Of course, there were lean times, when the inundation of the Nile failed them, but most often, this was not the case. In fact, we find many statues and pictures of ancient Egyptians who are well overweight.


However, it is very easy to describe any process in ancient Egypt in too broad of terms. We also must keep in mind that ancient Egypt spans thousands of years, and during that period their diets varied to some extent, while new foods were also added to their menus.


Bread and Cereal Food
Agriculture existed from an early date in Egypt. For the common people of Egypt, cereal foods formed the main backbone of their diet from the predynastic period onward Even for the rich, this staple mean generally consisted of a variety of different breads, often with other ingredients mixed in.


Sometimes these ingredients were purposeful, while at other times not. Because of the crude utensils used to make bread, quartz, felspar, mica, ferro magnesium minerals and other foreign bodies, including germs were almost always present in the flour. bread was made by mixing the dough, kneading it with both hands or sometimes with the feet in large containers. Yeast, salt, spices, milk and sometimes butter and eggs were then added, before the bread was placed in a baking form or patted into various shapes.


At first it was cooked in open fires or even on the embers. But from the Old Kingdom on, bread-moulds were used which were preheated, wiped with fat and filled with the dough. Slowly this process became more sophisticated.

In the Middle Kingdom, tall, tapered bread ovens with a firebox at the bottom, a grating and domed, upper compartment which was open at the top were used. At first, and really for even later common consumption, bread was usually cooked in the shape of a pancake. However, later bread was made in long or round rolls, and sometimes even shaped into figures, particularly for ceremonial purposes. Large, soft griddle cakes were also made, just as in Nubia today.

Sometimes thick loaves were made, with a hollow center that was then filled with beans, vegetables or other items. Sometimes flat bread was made with raised edges in order to hold eggs, or other fillings. Eventually, bread was made with various other ingredients, but there was no distinction between bread and pastries. Yet bread was often sweetened with honey or dates, or flavored with sesame, aniseed or fruit.

Vegetables
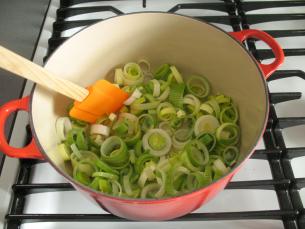
Obviously, even for the poor, other items such as vegetables, fruit and fish were consumed, all gifts of the Nile. They often ate beans, chick peas, lentils and green peas, just as modern Egyptians do today. Leeks and Egyptian lettuce was also popular. garlic were eaten, as well as thought to repel agents of diseases, and onions were popular, as well as being used for medical purposes. Though Herodotus tells us otherwise, radishes do not appear to have been consumed much.

Fruit
Chances are we do not know all the different types of fruit consumed. The most popular fruit in ancient Egypt was probably dates, which are rich in sugar and protein. While the rich used honey as a sweetener, the poor more often employed dates. They were also dried for later consumption, and were sometimes fermented to make wine.


We know that figs were eaten, but mostly from illustrations and references. Grapes were popular when available, and were also sun-dried to make raisins. Persea Mimusops laurifolia we know from the food left in tombs, as well as pomegranates, which have been found as far back as the 12th Dynasty.

We have even found a watermelon in the New Kingdom tomb of Nebseni. We only know of Egyptian plums from the New Kingdom, and the peach does not show up until the Ptolemaic (Greek) period. Olives were probably bought into Egypt with the Hyksos in the Second Intermediate Period, but walnuts and carob pods (St. John's bread) are only known from the New Kingdom onward.

Meat, Fish and Poultry


While it is difficult to believe that certain meats, such as fish and wild poultry did not show up fairly frequently on the tables of common people, we are told by Egyptologists that it was for the most part only the rich who regularly feasted on most meat. The poor ate geese, ducks, quails, cranes and other species, and from the New Kingdom onward raised domesticated fowl. Most edible fish from the Nile were consumed, though some fish, such as the genera Lepidotus and Phragus and a few others were forbidden because of their connection with the myth of Osiris.

In some locations, even the Nile perch was worshipped, and therefore never eaten. While fish were roasted or boiled, most frequently they were salted and preserved and dried in the sun.


Beef from cattle was frequently eaten by the rich, but appeared on the tables of common people usually only during festive occasions, when a sheep or goat might be slaughtered. We also see from tomb paintings, the preparation of wild game such as antelope, ibex, gazelles and deer. Pork was eaten, though the animal was associated with the evil god Seth. Early on it was widely consumed in Lower Egypt, but rarely in Upper Egypt. Yet we know that pigs were later bred and pork widely eaten throughout Egypt.

Dairy Products

While milk, cheese and butter are not well attested to, at least in text, we certainly believe that the early Egyptians were familiar with all of these dairy products. We do find a number of scenes showing men carrying what appears to be pots of milk or cream, and in one Theban tomb from the 19th dynasty, we find a seated woman pulling white cones of what is probably butter or cheese out of a large vessel.


Fats and Oil
There were also a number of different oils and fat used in the preparation of food. We know of beef, goat and other fats, and the Egyptian language had 21 different names for vegetable oils obtained from sesame, caster-oil plants, flax seed, radish seed, horseradish, safflower and colocynth. Horseradish oil was particularly popular. Oil and fat was mostly used for frying meat and vegetables, though food was also cooked in milk or butter.


Seasonings and Sweeteners
Sea salt, because of its connection to the evil Seth, was not consumed but salt from the Siwa Oasis was available. Pepper, however, only appears from the Greek period, but other spices were also used, including aniseed, cinnamon, coriander, cumin, dill, fennel, fenugreek, marjoram, mustard and thyme. Sugar itself does not appear in the Egyptian diet until late in history, though honey was used by the rich for a sweetener, but was probably too expensive for the poor.

Common people used various fruits as sweeteners, though the most popular seems to have been dates. Without doubt, because of Egypt's rich soil and lush vegetation, the rich of Egypt probably always ate well, even during times of drought. In the worst of times, common people probably suffered to some extent, but mostly they were probably fed well, though not as lavishly as the rich.

Banquets were frequent, as were various festivals and other celebrations, and at these times, it is likely that everyone enjoyed the bounty of the Black Land. In fact, it is likely that their superior nutrition had much to do with their success in the ancient world.


Common bakeries were not known until the New Kingdom, but larger kitchens were manned for work gangs, the military as well as the royal household and temple personnel. Common meals were often served with beer, or for the very rich, wine. Beer was fermented mostly from wheat, though occasionally stale bread was utilized. Notation: While one may discover "ancient Egyptian recipes" on the internet, text for recipes on cooking food are notoriously absent from the archaeological record.


Ancient Egyptian Alcohol
By Caroline Seawright

Serving girl, pouring wine at a banquet


The mouth of a perfectly contented man is filled with beer.

-- 2200 BC inscription

[She] sent you to school when you were ready to be taught writing, and she waited for you daily at home with bread and beer.

-- Instructions of Ani, regarding his mother

Beer, called hqt by the ancients and zythus by the Greeks, was a very important Egyptian drink. It was a drink for adults and children alike. It was the staple drink of the poor (wages were sometimes paid in beer), it was a drink of the rich and wealthy, and a drink offered to the gods and placed in the tombs of the dead.

Beer in the morning, beer in the afternoon and beer at night. A little wine thrown in for good measure. And after a hard day of cutting stones for the pharaoh, time and energy left for a bit of hanky-panky.


Workmen at the pyramids of the Giza Plateau were given beer, thrice daily -five kinds of beer and four kinds of wine were found by archaeologists "poking through dumps, examining skeletons, probing texts and studying remains of beer jars, and wine vats" at Giza.

In 1990, the Egyptian Exploration Society approached Scottish and Newcastle Breweries for help. This was the beginning of a partnership which, over the past five years, has considerably increased the understanding of the brewing process as it was at the time of Tutankhamun.

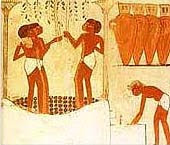
Beer was depicted on the walls of the tombs, as were scenes of the ancient Egyptian brewery. It was probably very similar to the way beer is still produced in Sudan today. Traditionally, beer was regarded as a female activity as it was an off-shoot of bread making - the basis of the beer were loaves of specially made bread.


Most likely, the beer was not very intoxicating, nutritious, sweet, without bubbles, and thick (the beer had to be strained with wooden syphons, used as a straw, because it was filled with impurities). Though the later Greek accounts suggest that the beer, instead, was as intoxicating as the strongest wine, and it is clear that the worshipers of Bast , Sekhmet and Hathor got drunk on beer as part of their worship of these goddesses, because of their aspect of the Eye of Ra. Tenenit was another ancient Egyptian goddess of beer.

Broadly speaking, the established view of ancient Egyptian brewing, drawn from tomb scenes, is as follows. Beer loaves were made from a richly yeasted dough. Malt may or may not have been used. This dough was lightly baked and the resulting bread was crumbled and strained through a sieve with water. Ingredients like dates or extra yeast might have been added. The dissolved mixture was fermented in large vats and then the liquid was decanted into jars which were sealed for storage or transport.

There is a lot missing, but an important question is what did the beer taste like? Thanks to the work done by the Egyptian Exploration Society and the Scottish and Newcastle Breweries, the ancient beer was probably "strongly influenced by the addition of fruit or spices as flavouring." The word 'bnr'

causes some problem - it is usually translated as 'date', but it may have referred to a different (or to any other) sweet-tasting food the Egyptians used in their beer. Although the dregs from ancient beer jars do show what ingredients were used, further work is needed before the exact flavour of the different beers can be established. In hieroglyphs, the

determinative of the beer jug

were used in words associated with beer - short for 'beer', 'tribute', 'to be drunk', 'food and drink' and 'butler'. The importance of beer in ancient Egypt can not be overlooked. 9 February 1996, the Herald-Sun reported that 'Tutankhamon Ale' will be based on sediment from jars found in a brewery housed in the Sun Temple of Nefertiti, and the team involved has gathered enough of the correct raw materials to produce "just 1000 bottles of the ale".

"We are about to unveil a great Tutankhamon secret," said Jim Merrington, commercial director at Newcastle Breweries, "The liquid gold of the pharaohs. It's a really amazing inheritance they have left us, the origins of beer itself."

The beer was reported to have an alcoholic content of between 5 and 6 percent and was to be produced in April, 1996. They were sold at Harrods for £50 per bottle, the proceeds going towards further research into Egyptian beer making.


Wine

May he (Osiris) give water, a cool breeze and wine to the spirit ...

-- 18th Dynasty, from the stela of Thuthmose the doorkeeper

Wine, known as yrp to the Egyptians, was very expensive. It was drunk by those who could afford it, used as offerings to the gods and to the dead. The resurrected pharaoh was known as one "one of the four gods ... who live on figs and who drink wine." Even in later times, the Greek tourists report that wine was confines to the wealthy. Though wine, too, was occasionally given out as pay - the workmen at the pyramids at Giza had four kinds of wine to drink, along with five kinds of beer.

The word wine, funnily enough, predates the word for vine, so it seems that the Egyptians imported wine long before they imported grapes to the Nile valley.

The Egyptians has several different kinds of wine, some of which have been commended by ancient authors for their excellent qualities. That of Mareotis was the most esteemed, and in the greatest quantity.

Athenæus tells us that the Mareotic wine was "white, its quality excellent, and it is sweet and light with a fragrant bouquet; it is by no means astringent, nor does it affect the head." Strabo wrote that the wine was also known for its long shelf-life.


Other wines of note to the Greeks were Teniotic, Thebiad, Sebennytic, Thasian, Manfesian, Ecbolada (forbidden to newly married brides!) This was only a small sample of wines made throughout Egypt. It seems, though, that the favourite wine from the Old Kingdom onwards was red wine. The white wine that the Greeks favoured was only produced from the Middle Kingdom onwards.


In ancient party scenes on the tomb walls, wine is seen offered to the guests. It seems that a lot of wine was consumed at the banquets, because there are a number of images depicting the guests throwing up or being carried home because of their drunken state - drunkenness was seen as an amusement to the ancient Egyptians!


At celebrations of drunkenness to the Eye of Ra, wine was also drunk by those who could afford it. The temples associated with the goddesses had their own vineyards to make sure that the celebrants had enough wine for the rituals. Wine was also an acceptable offering to the gods.


The search for the recipes and wine types of the Egyptians have yielded mixed results within the delta region of the Nile. Due to the climatic changes since the time of ancient Egypt, quests for the right vine, the right mixture of materials, and other factors, have left the modern renditions of ancient Egyptian wine with something to be desired ... It was not until 1931 that the first modern rendition of ancient Egyptian wine was produced. This rendition of the ancient wine continues to be made in the present day, however, many wine connoisseurs consider it of poor taste. Regardless, the taste of the ancients is still present 3,500 years later.


Egypt had vineyards all over the country, though most of them were in the Nile delta. Grapes were hand picked, then placed in a vat for traditional treading on the grapes, or in special wine presses. The resultant juice was captured in open jars, where the fermentation process took place. When ready, these jugs were sealed and marked with the date, name of the vineyard and the person in charge of the wine. Aged in these earthenware jars, they had to be broken when it was time to decant the wine, and then poured into yet another earthen jar. When the wine was ready to be served, it was poured into shallow vessels with a short stem.

In the Pyramid Texts the god Shezmu (Sesmu) brings the king grape juice for wine production. Although he was a god of wine and of the wine press, he was also a vengeful god - in a papyrus from the XXI Dynasty, Shezmu his cruel side was shown by two hawk deities twisting the net of the wine press which contains three human heads instead of grapes. Hathor , another deity of wine (and beer), was also both a goddess of love and a goddess of destruction.

Monday, April 4, 2011

A tour of the ICA at Metro.


Jim Trebbien

Director - Institute for the Culinary Arts.

Jim is a humble individual who takes pride in running the ICA program at Metro. Because of his contribution, the program has become successful locally and has even gained national attention. Students currently attend from different states because of what they have heard about the program!

I caught Jim taking a stroll through the sage bistro kitchen area, where he popped in to talk to students who were preparing meals for some important guest.

Thanks Jim, you will always have our trust and respect!


Chef Brian O’Malley
Chef – Instructor, Institute for the Culinary Arts

Chef O’Malley was my first instructor when I started the program at Metro. He helped me corral my thoughts and energy in the beginning, so that I could focus on a clear path that would lead to success. I didn’t really understand all of the advice he was offering at the time but I trusted him. Today, I am very clear about the direction I must take in order to make an impact in the hospitality industry. It is never about the money in this business, it’s always about the people and the community.

Thanks for taking the time to teach me that Chef O’Malley, its great advice!


Exterior of the Institute for Culinary Arts Building


Guest having lunch prepared by students at the Sage Bistro!


High school students taking a tour.


Students working their baking skills!


New students to the program learning knife skills!


Monday, March 28, 2011

Azalea "of Philly"

http://www.bonsai4me.com/Gallery/GalleryPhilippeMassard.htm


Azaleas are beautiful spring shrubs that are grown in different parts of the globe. In Japan, they have been known to live for hundreds of years. They are said to be of the genius Rhododendron family, and you can see why many worldwide are drawn to them.

If you enjoyed seeing and learning a little about this beautiful spectacle, you will be surprised to know that a different version has sprouted in the City of Philadelphia. That’s right! “Azaleas of Philly”, caught my eye while browsing and looking for intriguing restaurants to post on my blog.


Here is a very pleasant story about the restaurant, and the people who make Azaleas one of the must visit’s, if you are ever in this part of “the States”.

Click the link above to view!

Monday, March 14, 2011

Neapolitan-Style Pizza with Mozzarella, Prosciutto, and Roasted Red Pepper Sponsored by CIA


Fresh mozzarella and a drizzle of fruity, extra-virgin olive oil give this pizza a special character.

Makes 4 servings

2 red bell peppers
Two 12-inch Pizza Crusts (recipe follows)
1/2 cup tomato sauce
3/4 lb sliced fresh mozzarella
8 thin slices prosciutto
Extra-virgin olive oil as needed
Salt as needed
Freshly ground black pepper as needed


1.Preheat the oven to 450 degrees F. Prepare baking sheets by scattering them with cornmeal.
2.Char the red peppers directly in a gas flame until they are charred and blistered on all sides. Immediately place in a bowl or plastic bag and cover the peppers. Once they are cool enough to handle, pull away the skin and cut out the stem, ribs, and seeds. Cut into strips. Set aside.
3.Shape the pizza dough into two 12-inch rounds. Transfer the dough rounds to the cornmeal-scattered baking sheets. Bake the crust until firmed and set, about 10 minutes.
4.Spread 1/4 cup tomato sauce on each pizza. Layer the cheese, prosciutto, and peppers on the pizza crusts. Drizzle with a little olive oil and season with salt and pepper.
5.Bake the pizza until the crust is golden brown and crisp, 12 to 14 minutes. Let the pizza rest for 5 minutes before cutting and serving.

Pizza Crust
Makes one 16-inch or two 12-inch pizzas

3 1/2 cups bread flour, plus as needed
1/2 cup semolina or durum flour
1 1/2 tsp active dry yeast
1 1/2 cups room-temperature water (68–76°F)
3 tbsp olive oil, plus as needed
2 tsp salt
Cornmeal for dusting


1.To prepare the dough, combine the flours and yeast in the bowl of a stand mixer fitted with the dough hook. Add the water, olive oil, and salt and mix on low speed for 2 minutes.
2.Increase the speed to medium and knead until the dough is quite elastic but still a little sticky, 4 minutes.
3.Transfer the dough to a lightly oiled bowl, turn the dough to coat it with the oil, cover with plastic wrap or a damp towel, and allow to rise in a warm place until nearly doubled in size, about 30 minutes.
4.Fold the dough gently, cover, and let rest until relaxed, 15–20 minutes, before cutting it into 2 equal pieces, if necessary, and rounding the dough into a smooth ball(s). Cover the dough and let rest another 15–20 minutes before shaping into a pizza crust.
Cook with the proper tools. Use the 9 1/2" x 13" Baking Sheet and the Pizza Wheel to create Neapolitan-Style Pizza.

How to Clean and Prepare Leeks!

I was in class last week and someone asked me if I knew the proper way to prepare leeks. Well, I told her that I had a good idea but I really wasn’t sure. I promised to do a little research and post the results on my blog. So, here you go Nicki, I hope this help!

Courtesy of startcooking.com


Well, leeks are part of the onion family and, in fact, look like a giant version of green onions. However, the little green onion has a much stronger onion flavor then the leek. Another difference is that you need to cook leeks before eating them. Unlike an onion, you would not add an uncooked leek to a salad!


Green Onions

Leeks are a very mellow version of an onion and when cut they have a beautiful variation in color. They go from white down by the root, to a yellow center, to a really dark green at the top.


Cut the leek just below the really dark green part. Those really dark, green leaves are very tough and you don’t eat them. Like an onion, the leek has a lot of layers on the inside, except that the leek has a lot more finer layers. Each of these layers has an amazing amount of sandy grit between them. Leeks have to get washed really well to get rid of all that grit.

If you are going to cut the leaks into rings or small strips, do that first, and then put them in a bowl of cool water.


I’m using my salad spinner. The leeks will float to the top and the grit will sink to the bottom of the bowl. You will need to swish everything around a bit to make sure all the layers of leek are separated.

You can then run them through your salad spinner or just lay them out on a towel to dry off.


If you are going to cook the leek whole, you still have to cut it in half to wash it. (Or you could just make a cut half way through and spread open the leaves.) Fan out the layers with your fingers and let the water run through.


Now you are ready to cook with leeks!

Monday, February 28, 2011

Mike's delicious lemon chicken recipe. One of the best you'll ever taste!


One well washed chicken cut into pieces
1 cup limon juice
1/2 stick of butter
2 tbls peprika
limon zest
flour, & your choice of seasoning
Melt butter and limon juice together
season chicken to your liking


Mix flour, limon zest and peprika together
flour chick pieces and place on raised broiler rack skin side up
pour limon juice/butter mixture evenly over chicken pieces
bake @ 375 until done
when done, at once remove chicken from pan and place on serving platter skin side up (chicken can be prepared with or without the skin)

Jerk Grilled Wings


"Spicy, citrus, earthy, with the right amount of thyme. These wings should be a hit as long as your guests are brave enough to take some Caribbean heat. Serve this with a mango, cilantro, sour cream, mayonnaise, and buttermilk dipping sauce. "
Original Recipe Yield 12 wings

Ingredients
• 1/4 cup fresh squeezed orange juice
• 2 tablespoons lemon juice
• 2 tablespoons lime juice
• 1 teaspoon salt
• 2 teaspoons ground black pepper
• 1 tablespoon chopped fresh thyme
• 1 tablespoon chopped garlic
• 1 tablespoon chopped fresh ginger
• 1 habanera pepper, seeded and chopped (use gloves)
• 1 tablespoon curry powder
• 1/2 teaspoon ground allspice
• 1/4 teaspoon ground nutmeg
• 1/4 teaspoon ground cinnamon
• 1/2 cup vegetable oil
• 12 large chicken wings, tips removed and wings cut apart at joint
Directions
1. Mix together the orange juice, lemon juice, lime juice, salt, black pepper, thyme, garlic, ginger, habanera pepper, curry powder, allspice, nutmeg, and cinnamon in a bowl. Whisk in the vegetable oil. Pour 3/4 of the marinade into a resealable plastic zipper bag, and place the chicken wing pieces into the bag. Squeeze out any air, and mix the wing pieces with the marinade, and refrigerate from 4 to 12 hours. Place the remaining 1/4 of the marinade in a small bowl, and refrigerate until grilling time.
2. Preheat an outdoor grill for medium heat, and lightly oil the grate.
3. Remove the wing pieces from the bag of marinade, and discard the used marinade. Sprinkle the wings with salt and pepper to taste, and sear on the hottest part of the grill until the wings begin to brown, about 4 minutes per side.
4. Move the wings to a less-hot part of the grill, baste with the unused portion of the marinade, and close the grill. Grill until the wings are golden brown, show good grill marks, are no longer pink in the center, and the juices run clear, 10 to 15 more minutes. Baste again with marinade and turn after 5 to 8 minutes.
Footnotes
• The nutrition data for this recipe includes the full amount of the marinade ingredients. The actual amount of the marinade consumed will vary.

Nutritional Information
Amount per Serving:
Calories: 373
Total Fat: 34.8g
Cholesterol: 31mg

Jerk Seasoning
Ingredients
• 2 tablespoons dried minced onion
• 2 1/2 teaspoons dried thyme
• 2 teaspoons ground allspice
• 2 teaspoons ground black pepper
• 1/2 teaspoon ground cinnamon
• 1/2 teaspoon cayenne pepper
• 1/2 teaspoon salt
• 2 tablespoons vegetable oil
Directions
1. In a small bowl, stir together the dried onion, thyme, allspice, ground black pepper, cinnamon, cayenne pepper, and salt. Coat meat lightly with oil, then rub seasoning onto meat.

Wednesday, February 23, 2011

Creole Chicken and Vegetables


Enjoy the flavor of summer anytime by using frozen bell peppers and frozen okra in this speedy Creole dish. For a filling meal, serve over rice.

Yield: 4 servings (serving size: 1 cup)

Ingredients

• Cooking spray
• 1 pound chicken breast tenders
• 2 cups frozen pepper stir-fry (such as Bird's Eye brand), thawed
• 1 cup frozen cut okra, thawed
• 3/4 cup thinly sliced celery
• 3/4 teaspoon sugar
• 1/2 teaspoon salt
• 1/2 teaspoon dried thyme
• 1/4 teaspoon ground red pepper
• 1 (14.5-ounce) can diced tomatoes, undrained
• 1/4 cup chopped fresh parsley
• 1 tablespoon butter

Preparation

Heat a large nonstick skillet over medium-high heat. Coat pan with cooking spray. Add chicken; cook 3 minutes on each side or until browned. Add pepper stir-fry and next 6 ingredients (through red pepper), stirring to combine. Pour tomatoes over chicken mixture; bring to a boil. Cover, reduce heat, and simmer 5 minutes. Uncover; cook 3 minutes. Add parsley and butter, stirring until butter melts.

Nutritional Information

Calories: 199 (20% from fat)

Fat: 4.4g (sat 1.8g,mono 1.5g,poly 0.5g)

Protein: 28.3g

Carbohydrate: 11g

Fiber: 3.2g

Cholesterol: 73mg

Iron: 1.9mg

Sodium: 550mg

Calcium: 71mg

Cajun Shrimp and Andouille Alfredo Sauce Over Pasta


Fettuccine topped with creamy and rich Cajun shrimp and Andouille alfredo sauce makes a hearty meal perfect for entertaining.
Prep Time: 45 minutes
Cook Time: 40 minutes


Yield: Makes 6 servings

Ingredients
• 1 pound unpeeled, medium-size fresh shrimp
• 1 (12-ounce) package fettuccine
• 1/2 pound Andouille sausage, chopped
• 1/2 cup butter or margarine
• 1 medium onion, chopped
• 1 small green bell pepper, chopped
• 4 celery ribs, chopped (about 1 cup)
• 4 garlic cloves, minced
• 1 1/2 tablespoons salt-free Cajun seasoning
• 3 tablespoons all-purpose flour
• 2 cups chicken broth
• 1 1/2 cups heavy cream
• 6 ounces pasteurized prepared cheese product, cubed
• 3/4 cup chopped green onions
• 1/3 cup grated Parmesan cheese
• 3 tablespoons chopped fresh parsley


Preparation

Peel shrimp, and devein, if desired. Set aside.
Prepare fettuccine according to package directions; drain pasta, and set aside.
Cook sausage in a large Dutch oven over medium heat 10 minutes or until browned; remove sausage, and drain, reserving 1 tablespoon drippings in Dutch oven. Set sausage aside.
Melt butter in drippings in Dutch oven over medium heat. Add shrimp, and cook 5 minutes or just until shrimp turn pink. Remove shrimp, and keep warm.
Add onion and next 3 ingredients; cook, stirring constantly, over medium heat 10 minutes. Stir in Cajun seasoning and flour. Cook over medium heat, 1 minute, stirring constantly. Gradually stir in chicken broth. Bring to a boil over medium-high heat, stirring occasionally. Boil 1 minute. Reduce heat to medium-low, and stir in heavy cream; cook over medium-low heat 8 minutes or until mixture simmers. Add pasteurized cheese cubes, sausage, and shrimp, stirring until cheese melts.
Stir in chopped green onions, Parmesan cheese, and chopped fresh parsley. Serve over hot cooked fettuccine.

Curry-Mango Shrimp


Yield: Makes 2 to 3 servings

Ingredients

• 1/2 cup mango chutney
• 3 tablespoons fresh lime juice
• 1 tablespoon olive oil
• 1 tablespoon grated fresh ginger
• 1/2 teaspoon curry powder
• 1 pound peeled and deveined large shrimp
• 3 (10-inch) metal skewers


Preparation
Combine first 5 ingredients; brush half of mixture over shrimp. Cover and let stand 15 minutes. Thread shrimp evenly onto skewers.
Grill shrimp, covered with grill lid, over medium-high heat (350º to 400º) 3 minutes on each side or until shrimp turn pink. Brush with remaining chutney mixture, and serve.
Pour: To complement the diverse flavors of the curry-mango marinade, try a Hogue Riesling from Washington's Columbia Valley. The naturally crisp acidity balances sweet peach and apricot flavors for a refreshing finish.

Grilled Shrimp Tacos


To keep the shrimp from spinning when flipped, thread them on 2 parallel skewers instead of one.

Prep Time: 30 minutes
Other: 15 minutes

Yield: Makes 8 first-course or 4 main-course servings

Ingredients

• 1/2 cup sour cream
• 3 tablespoons mayonnaise
• 3 tablespoons milk
• 1/2 teaspoon ground cumin
• 1 1/2 pounds large shrimp, peeled
• 3 tablespoons butter, melted
• 2 large garlic cloves, minced
• 4 limes, cut into quarters
• 1/2 teaspoon kosher salt
• 8 6-inch corn tortillas
• 2 to 3 cups finely shredded green cabbage
• Bottled green tomatillo salsa


Preparation

Whisk together the sour cream, mayonnaise, milk, and cumin. Set aside. Skewer the shrimp. (If using wood skewers, soak them in water for 10 minutes beforehand.) In a small bowl, combine the butter and garlic. Preheat a gas grill to high; adjust to medium after 15 minutes. (If cooking over charcoal, allow the coals to burn until they are covered with gray ash.) Brush the skewered shrimp with the garlic butter. Place them on the grill with the limes. Cook about 4 minutes on each side or until the shrimp are opaque and the limes are browned. Remove from grill. Lightly salt the shrimp. Grill the tortillas for 30 seconds on each side, then place inside a paper bag to keep warm. To serve, pull the shrimp off the skewers and divide them evenly among the tortillas. Top with the cabbage, sour cream sauce, tomatillo salsa, and a spritz of grilled lime.

Rainy-Day Method: Broil the shrimp and limes about 4 inches from the heat using the cooking times above. Wrap the tortillas in foil and heat in a 350° F oven for 15 minutes, or wrap them in a napkin and microwave for 3 minutes.

Nutritional Information

Calories: 247 (0% from fat)
Fat: 13g (sat 5g)
Protein: 16mg
Carbohydrate: 18g
Fiber: 3g
Cholesterol: 147mg
Iron: 3mg
Sodium: 345mg
Calcium: 96mg

Stir-Fried Ginger Shrimp


The peppery flavor of ginger complements the spiciness of the chile paste and sweetness of the rice wine. Serve with jasmine rice and melon slices.


Yield: 4 servings (serving size: about 1 cup)

Ingredient

• 1 pound medium shrimp, peeled and deveined
• 1 teaspoon chopped peeled fresh ginger
• 1/2 teaspoon salt
• Dash of white pepper
• 1/2 cup water
• 1 tablespoon mirin (sweet rice wine)
• 2 teaspoons low-sodium soy sauce
• 1 1/2 teaspoons cornstarch
• 1 teaspoon sugar
• 1 teaspoon dark sesame oil
• 1/2 teaspoon chile paste with garlic (such as sambal oelek)
• 1 tablespoon canola oil, divided
• 1 cup thinly vertically sliced onion
• 4 garlic cloves, minced
• 1 cup diagonally cut celery


Preparation

1. Place shrimp in a medium bowl. Sprinkle with ginger, salt, and pepper; toss well. Let stand 5 minutes.
2. Combine 1/2 cup water and next 6 ingredients (through chile paste) in a small bowl, stirring with a whisk.
3. Heat 1 teaspoon canola oil in a large nonstick skillet over medium-high heat. Add shrimp mixture to pan; stir-fry 2 minutes. Remove shrimp mixture from pan; set aside. Wipe pan dry with a paper towel. Heat remaining 2 teaspoons canola oil in pan over medium-high heat. Add onion and garlic; stir-fry 1 minute. Add celery; stir-fry 1 minute. Return shrimp mixture to pan; stir-fry 1 minute or until shrimp are done.
4. Add water mixture to pan. Bring to a boil; cook 1 minute or until thick, stirring constantly with a whisk. Serve immediately.

Nutritional Information

Calories: 192 (31% from fat)
Fat: 6.7g (sat 0.8g,mono 2.9g,poly 2.3g)
Protein: 23.8g
Carbohydrate: 7.2g
Fiber: 0.8g
Cholesterol: 172mg
Iron: 3mg
Sodium: 594mg
Calcium: 82mg